How to Sculpt Characters for Motion: A Complete Beginner’s Guide
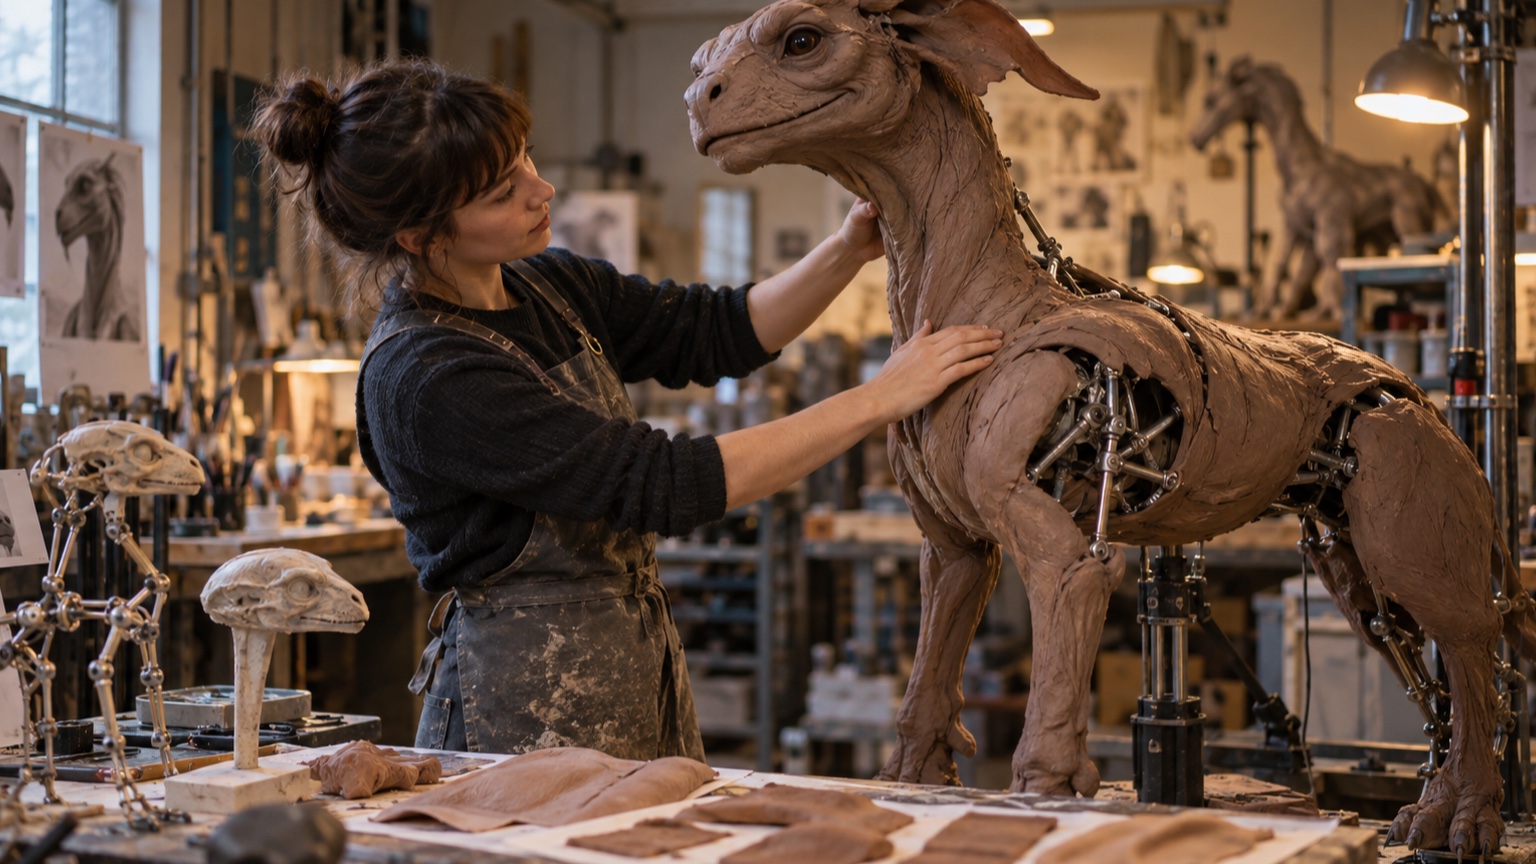
Sculpting a character that will move requires a different mindset from sculpting a fixed display piece. The form must look convincing in a neutral position, but it also has to bend, compress, stretch, clear internal hardware, and survive repeated operation. A beautiful elbow can become unusable if the skin has nowhere to fold. A carefully modeled cheek can collapse when a cable pulls beneath it. The safest approach is to treat movement as part of the form from the first sketch. Learn where the pivots sit, choose a neutral pose that leaves travel in both directions, build major masses around the mechanism, and test flexible zones before fine detail makes changes expensive. This beginner’s guide follows that order. It covers armatures, joint centers, compression, skin thickness, folds, clearances, molding, casting, collaboration, testing, and service access. The result should not merely tolerate movement; its shapes should make the motion look natural and preserve the character’s identity throughout the range.
A: Yes. Wear, calibration, temperature, and handling can all shift it.
A: Use the signed-off version tested under final conditions.
A: No. Repeat the setup against the same baseline.
A: Make a stripped-down study and review it from the real audience position.
A: Only after it succeeds in two matching tests.
A: It should strengthen the main idea, not pull attention away from it.
A: Use the least amount that remains clear at audience distance.
A: Check transitions, side views, extreme ranges, and changing light.
A: Usually. Remove one secondary cue at a time and see whether the result still works.
A: Include the person responsible for the final medium and someone seeing the work fresh.
Write a Motion Brief Before Sculpting
List what the character must do, how often it will do it, and who will see it. “Turn the head 35 degrees each way and look down toward a child-height audience” is far more useful than “head moves.” Include speed, emotional tone, viewing distance, and any pose that must be held. Separate required actions from desirable extras. This protects space for the movements that matter when the mechanism, costume, and skin begin competing for room. Add reference images for posture and material behavior, but do not assume a living body can be copied directly onto a mechanical structure. Note the expected service life as well. A demonstration model that moves ten times has different needs from a figure expected to perform hundreds of cycles every day.
Learn the Armature and Pivot Locations
Study the mechanism before covering it. Identify every pivot, sliding part, hard stop, cable path, fastener, and service opening. Mark joint centers on drawings and on the physical armature so they remain visible while clay is added.
Move each axis by hand and watch the space it sweeps. The volume occupied during motion is often larger than the mechanism at rest. Keep clay, foam, and future skin outside that swept envelope unless the material is designed to compress there. Photographs from the front, side, and top help translate this invisible clearance into the sculpt.
Ask the mechanism team which dimensions are fixed and which can still change. A few millimeters moved early may prevent a much larger compromise in the outer form.
Choose a Motion-Aware Neutral Pose
Neutral should sit near the middle of the useful range, not at an attractive extreme. A neck sculpted fully upright has nowhere to extend; a bent elbow built at its tightest angle cannot compress further. Position the armature so important movements have room on both sides. The pose should also express the character. A timid figure may carry the shoulders slightly forward, while a confident one may hold the chest open. Keep those choices subtle enough that the mechanism can still reach its performance poses without fighting the sculpted posture. Photograph neutral before every major revision. Side-by-side images reveal gradual posture drift that is difficult to notice while working directly on the figure.
Block the Largest Masses First
Build the rib cage, pelvis, skull, major limb volumes, and muzzle before defining muscles or wrinkles. View them as connected weight-bearing forms. Their proportions and overlap determine whether the character remains believable as joints move.
Use removable blocks or soft material during this stage. Rotate the mechanism through its range after every major addition. A collision found in rough foam takes minutes to correct; the same discovery after molding and finishing can require rebuilding several parts. Judge the blockout from the audience position as well as the workbench. Large masses often need cleaner separation when the finished character will be viewed from below.
Mark Joint Centers on the Sculpture
Transfer each mechanical pivot to the visible surface with a pin, pencil line, or temporary tape mark. Compare it with the anatomical joint the character seems to possess. The two do not need to coincide perfectly, but a large mismatch can make the limb appear to break or slide. Check the mark from multiple angles. A shoulder pivot hidden inside a broad torso may need an exterior form that redirects the apparent rotation. Preserve these guides until range tests are complete; surface detail can easily obscure the evidence needed to diagnose a bad bend.
Plan Compression and Stretch Zones
Every bend creates a compressed side and a stretched side. At an elbow, material gathers inside the joint while the outside lengthens. At the neck, turning compresses one side and opens the other. Draw these zones directly on a duplicate cast or clay study.
Give compressed material somewhere to go. Shallow channels, planned folds, reduced thickness, or overlapping forms can prevent a random bulge.
On the stretched side, avoid short heavy texture that will flatten abruptly. Test both extremes because a solution that works in one direction may bind in the other.
Preserve Mechanical Clearances
Clearance is not empty space waiting to be filled. It is part of the moving system. Establish a minimum gap around linkages, bearings, cables, and hard structures, then maintain it as the sculpt develops. Flexible skin can still be pulled into a pinch point. Use soft clay strips or temporary foam to simulate the future skin and cycle the joint slowly. Look for rubbing, cutting, and places where material becomes trapped. Add protective liners or revise the form before final thickness is established. Never depend on speed to carry a collision past itself.
Sculpt Folds With a Direction
Folds should explain the force acting on the material. Compression creates shorter, denser folds that point toward the bend; tension creates longer lines that radiate away from it. Random wrinkles may look detailed in neutral but become chaotic during motion.
Study clothing, skin, and rubber separately because they do not fold alike. Build the main fold paths first and let smaller creases support them. During a range test, watch whether the sculpted fold opens naturally or fights a new fold created by the mechanism.
Control Thickness Across Flexible Areas
Thick flexible material resists bending and can overload a small mechanism. Very thin material moves easily but may wrinkle, tear, or reveal internal shapes. Plan thickness according to travel, span, material hardness, and the support beneath it. Make stepped test samples before committing to the character. Cast several thicknesses of the intended material, bend them over a comparable radius, and observe recovery after repeated cycles. Keep measurements with the approved sample; visual memory is not precise enough for reproduction.
Separate Rigid and Flexible Forms
Decide which shapes should hold their form and which should deform. Skulls, armor plates, beaks, horns, and teeth usually need stable support.
Cheeks, neck webs, lips, and joint covers may need controlled flexibility. The transition between them deserves as much attention as either material.
Hide boundaries along natural seams, under overlaps, or where a change in material makes sense. Feathering a flexible skin onto a rigid core can prevent a visible ledge, but the bond line must remain accessible if repair is likely. Avoid asking a thin skin to bridge a large unsupported gap.
Design Features for Repeated Motion
Small features often fail first. Eyelid edges, fingertips, lip corners, and narrow folds experience concentrated stress. Round internal corners, avoid razor-thin sections, and reduce detail where the material repeatedly flexes. Consider how paint and adhesive affect movement. A coating may stiffen a delicate area or crack at a fold even when the base material survives. Cycle representative finished samples, not only bare rubber. The most durable option may require a slightly broader, cleaner form.
Test Range With Temporary Materials
Use soft clay, foam, fabric, or inexpensive elastomer to cover the mechanism before producing a finished mold. Temporary material reveals collisions and volume changes without turning every adjustment into a major repair. Secure it well enough that slipping does not create false problems.
Move slowly at first and stop at the first sign of strain. Mark the position, photograph the failure, and identify whether the cause is thickness, attachment, clearance, or pivot placement. After correction, repeat the same path before increasing speed.
Study the Sculpture From Audience Views
A form that looks correct at arm’s length may fail from the floor, across a room, or through a set opening. Place the prototype at installation height and mark the actual viewing area. Test neutral and extreme poses from those locations. Pay attention to silhouette, gaps, exposed hardware, and the apparent location of joints. Close inspection is still useful for craftsmanship, but audience views decide whether the motion communicates. Use phone video from fixed positions so revisions can be compared honestly.
Plan Parting Lines and Mold Access
Mold divisions must release the sculpt without destroying important texture or trapping deep undercuts. Place parting lines along low-visibility boundaries when possible, but do not create a seam that will split open at a highly flexed area.
Think ahead to casting, trimming, bonding, and future replacement.
A beautiful one-piece skin may be difficult to demold or impossible to install around the armature. Removable face, neck, or limb sections can simplify service if their joins are integrated into the design.
Account for Casting and Skin Behavior
The finished material will not behave exactly like clay. Silicone and urethane shrink, stretch, slump, and take paint differently. Hollow casts may collapse between supports, while foam-filled areas can become stiffer than expected. Make material tests that include the proposed thickness, backing, pigment, and finish. Mount them over a curve similar to the character and cycle them. Use those results to revise the sculpt rather than expecting the casting process to preserve every edge unchanged.
Communicate With the Mechanism Team
Share work early and use physical references. Mark keep-out zones, target surfaces, attachment points, and areas where form can change. A mechanism designer may solve a sculpting problem by moving a linkage, while the sculptor may create needed clearance with a small proportion adjustment.
Record decisions on updated drawings or photographs. Verbal agreements are easily lost when parts are revised. Regular short reviews are more effective than presenting a finished sculpt that forces the mechanism to fit around assumptions.
Run Progressive Motion Tests
Test in stages: one axis slowly, the same axis at speed, paired axes, full performance phrases, and finally repeated cycles. This order makes causes easier to isolate. Jumping directly to the complete routine can hide a small collision until damage appears. Inspect between stages. Look for heat, shiny rub marks, torn edges, permanent stretch, loose bonds, and changes in neutral position. Increase duration only after the shorter test remains stable. Record settings and cycle counts so “it worked for a while” becomes useful evidence.
Finish for Service and Longevity
Surface finish must survive handling, cleaning, and flexing. Keep heavy paint away from high-strain folds, reinforce vulnerable edges, and design access panels that technicians can open without damaging nearby texture. Match repair materials to the original system.
Create a service kit with color recipes, sample chips, adhesives, release instructions, and photographs of the approved neutral pose.
Label removable parts and fasteners. A motion-ready sculpture is complete only when the team can maintain its form and movement after ordinary wear begins.